Monday, 2 September 2013

Take A Seat At...

I'm sure you are all aware that table numbers play an important role in a wedding - even though they are such a small part of it. Your guests will walk through the doors, into the reception room, locate their name on the table plan, see the table number and off they pop to sit at their seat as happy as Larry (until they realise who they are sharing a table with!). 
Now I believe that just because table numbers are functional doesn't mean they can't be pretty - I mean they will become part of the decor after all. Because of this, I have decided to do just that, and make my table numbers part of the decoration.

Design Idea
The theme of my wedding is quite 'English Country Garden'. In-keeping with this, I have decided to name my tables after flowers rather than give them a number. After meeting with my florist, I gathered up the names of all the flowers being used on our big day and hey presto! I had my table names.
Once I had decided on the table names, I started to think about how to display them on each table. Before long I had four main elements I wanted to work with:
        - Photo frames
        - Floral paper
        - Diamantes
        - Pearls
The idea was to display the table names in attractive photo frames, backed onto floral paper and embellished with diamantes and pearls. In my head it looked lovely - I just had to try it out...!


___________________________________________________________


I started by choosing floral paper to mount the table names onto. I have used the same 12"x12" papers as I did on my Save-The-Dates to maintain continuity. These good quality papers come in a 32 pack (16 designs, 2 of each) and are available from Daisy's Jewels and Crafts.
I should be having around 10 tables at the reception (including the head table) and have chosen a different style paper for each one.


I wanted to add a touch of glamour and interest to the table names. Whilst visiting my recent home-away-from-home (Hobbycraft) I found some self-adhesive diamantes and pearls that would do the trick. I decided to add both to the mix and alternate them around the table name. The fact that they were self-adhesive sold them to me. This meant less mess to worry about and I knew they would look neat (no excess glue to ruin the look). 


I chose some thick, good quality paper in a parchment-style for the table names to be typed on to. I thought this style would add some charm and mix well with the floral patterns. I decided on the same font that I used on my Save-The-Dates for the Flower Names. To impress the passionate gardeners on my mum's side of the family, I included the Latin name underneath to add an extra touch!

Now even though I loved this idea and wanted it all to look as high quality as possible, I had a slight issue with finding the correct photo frames. As you know, they are not the cheapest of items to come across if you want something that looks half decent. I found that on average, the kind of frames I were looking at were around £8.00, which is £80.00 altogether!!! As I am trying to do a wedding on a budget, this just wasn't feasible. 

After a lot of searching, and thinking until my brain hurt I came across some pale blue and silver glossy frames in.... wait for it.... Poundland! Which came to a grand total of £11 (I bought one extra just in case). They fit the bill perfectly and look a lot better than one would have expected. During the process of creating my own decor, I have found that you really have to search, rummage and think a little more outside the box to get your perfect look for good money. 

And here they are! The end product.
In case you are wondering, they did take a little while, but I worked on them gradually in my spare time. This made them a fun little project. My one niggle would be the measuring out on each and every one to make sure every piece of paper were the same size and every diamante and pearl were spaced evenly. Having said that, precision is not a bad thing!

I would love to know your thoughts if you have any. Would you have done anything different? Maybe you have worked on something similar yourself. Keep me posted.

Keep watching this space.

Zo..x


Sunday, 7 July 2013

Crafty In Cornwall

In my opinion, Cornwall is the best place to stay in Britain. During my very recent trip there, I visited a little harbour village called Charlestown. Throughout my two week holiday, I paid Charlestown three visits and have become very fond of the traditional, historical and overall friendly village. 


One place within Charlestown that particularly interested me was the Charlestown Gallery - The Don Austen Studio. If any of you take a trip to Cornwall, I would highly recommend having a gander around this shop. 


Here I met the lovely Gemma Austen, who runs the shop and also sells her own artwork there (which I loved!). I really enjoyed looking around the studio as there were so many beautiful, hand-crafted items and home wares to ponder over (which admittedly made it very difficult to keep my pennies in my pocket!).
.................................................................................................

It is the sweet little touches like this sign on the entrance door that add a certain charm to the studio.


As you enter the shop, to the left is a display of various items created from driftwood. Alongside the boat models and the storage boxes (shown in the photos), there are sconces, tea light holders and lamps available. They have been made by Duchy Driftwood and have a wonderful rustic charm about them. I was immediately drawn to the handmade boxes. I love the whitewash, the rope-and-peg catch, and especially the cluster of stones in the top - which I found added a touch of originality. 
The driftwood box was my first purchase as I just couldn't help myself! I have since found out that it was crafted by Jason Webb.


Gemma stocks a lot of her own handmade and hand drawn items. The drawings and images are so quirky and fun to look at. There is something quite child-like about them, which caught my attention. I liked the pots so much, I got one to use as a pen pot!


One thing I particularly adored were the hand-written price labels placed around the shop. The handwriting has character and the labels acknowledge those who created each piece (which I feel is something you should know before purchasing). 

This specific label stood out to me because of the personal touch - I love it! I had noticed that Nanny Eileen had also crocheted a selection of lovely shawls that had a very professional finish to them.

I am exceptionally fond of this photograph, as it captures the moment I discovered my favourite print by Gemma. The animals are so whimsical and I have always loved grey and yellow together! Now I'm home I need to get it framed which I am hoping to get done soon.

In a tall, glass display cabinet to the right of the shop is a selection of handmade jewellery. These three photos show just a handful of the pretty items on display.

Whether they are dangling from the ceiling or lined up on the windowsill, everywhere you look, there is something interesting to observe. The fabric lanterns are particularly nice!


I hope I have tempted you to pay the Charlestown Gallery a visit. There are plenty of gifts, home wares, prints, and stationary items to look through and I'm pretty sure you will find something you will want to keep!

I would highly recommend you pay Gemma's blog and online shop a visit to keep up to date with new pieces she has to offer:


Overall, my trip to Cornwall was lovely, and writing this feature has helped me to preserve the memory of one of my favourite places during this trip. 

Let me know what you think of the items on display, I would love to hear your opinions! 

Keep watching this space.
Zoe..x


Photography by Declan Rollings 

With thanks to Gemma Austen of Gemma Austen's Art

Monday, 17 June 2013

Handmade Save-The-Dates

Hi guys! I know it has been a while since my last post, but the ball is really starting to roll on the hand-made stuff now so hopefully my posts will be a little more frequent! My next post is on my Save-The-Dates.

Now if I'm right, Save-The-Dates are more of an American tradition and we Brits don't tend to send them out. However, they do seem to be growing in popularity throughout the UK now. With our wedding falling on a bank holiday weekend, I thought this would be an ideal way to let my guests know early on and I could get in there before the thought of any weekend getaways!!

Right. Now the idea for my Save-The-Dates was again country garden - to compliment my evening theme. This immediately brought bunting, floral patterns and pastel colours into my head. With this to go from, my mum took a trip to Hobbycraft after work. Here she found a few bits and bobs for me to work with, and come up with a final design.

The Design Idea
Bunting - Four different flags strung together with pretty craft string and 'draped' across the front of the Save-The-Date.
Florals - Floral-print paper to trim the interior.
Pastels - Metallic pastel paper to mount the information onto.
Mini Calendars - A handy calendar card to the inside of the Save-The-Date for the guests to keep hold of. 


The Front
What I really like about this design, is that each and every Save-The-Date is different - due to the different bunting flags and string colour. 
The flags came with pre-cut holes which was handy for neatly threading the string. Once threaded, the flags were held in place by the use of mini square 3D foam adhesives. 
I love these because it prevents the design from looking too flat. The double sided foam adhesives can be picked up from most art shops and are very cheap. 
The blank cards themselves fitted the theme perfectly, as the bottom edge represents lace and also features rose motifs. These cards, the bunting flags and the string were all picked up from Hobbycraft (which recently has become my second home!!).


The Interior
These 12x12" papers were used for the inside of my Save-The-Dates and worked really well - especially for covering up the string from the bunting! I got them from an online craft suppliers I found called Daisy's Jewels & Crafts. The papers are very good quality and come in a 32 pack (16 designs, 2 of each) and have come in really handy for other wedding related projects - shhh! I'm not spilling just yet!


Here is a sneaky of the inside. The information and the mini calendar were printed on good quality, textured card. The information was mounted on metallic, pastel blue/green paper. All were fixed with the foam adhesives. 
The card and the metallic paper are from my recently acquired second home; Hobbycraft.


The Finished Product
Again, I love the personal touch. The fact that each one is different, causes me to like this even more. To be honest, I have spent many evenings making these. However, having other projects to work on and leaving myself plenty of time to do them, I have really enjoyed creating them - it has been fairly therapeutic!


I have added an extra personal touch by investing in a stamp that reads 'Handmade By Zoe' which I absolutely adore! If you are into making Christmas cards etc. and like this idea, then personalised stamps like this are available from NotOnTheHighstreet (love this site).


If any of you are thinking of creating your own Save-The-Dates, invites, order or service sheets or anything like this... I would definitely say go for it! Yes, it takes a little time finding all of the materials, but the outcome is so rewarding. Not only this, but the guests seem to appreciate them too!

I would love to know what you think, and if anybody has made anything similar to this... I would really fancy a nosey!

Keep watching this space,
Zoe..x


Saturday, 13 April 2013

Fab Favours

So the first chapter for my very first craft blog is my own wedding. Reason being, I would like to hand-make a lot of it (making it the perfect HBZ blog project).

Although stationary is probably the first thing I should have thought about, it was the second. The wedding favours were the first.

Okay, so the idea was to give my guests a country garden gift to go with the theme. My thinking was jars filled with yummy preserves. My mum's homemade jam is delicious and, luckily for me, she also has a friend that keeps bees. Hello Honey!
I then decided that jam would be the ideal gift for the ladies, and honey for the men.

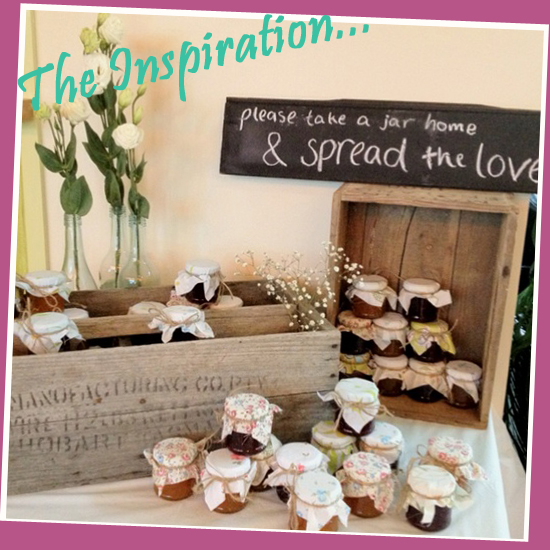
This was my starting point, so naturally I started looking for further inspiration.


I love the way the jars have been laid out in this photograph. This is a good idea for the evening guests as the day guests will have theirs at their place setting.

The fabric toppers are traditional and cute and would look lovely if they were all different patterns. 


Image found on Pinterest.


I love the personal touch, and even though homemade jam and fresh local honey is personal, it wouldn't be something I had created. To add that extra touch to the favours, I have decided to cross stitch the jar toppers.

The Idea:
Ladies - A cross stitched butterfly for the jam
Gents - A cross stitched bee for the honey
Young Children - A cross stitched ladybug


3 down, 117 more to go! Okay so there is a lot of work to do to get approx 120 toppers done it time. You find though that the more you do the faster you get and it is quite therapeutic.

Tip: It may sound like common sense, but if you are planning a crafty wedding, start waaaay in advance (around a year or so). Only because the deeper you progress into your plans, the more you struggle to find the time to keep on top of things. If you have friends or relatives that can help you out, let them! My mum is cross stitching in every spare minute she has!


The Process


After cross stitching my first bee, I decided the topper needed to be softened and made slightly bigger by the use of fabric. I picked up a couple of meters of cheap white cotton fabric from my local sewing shop and hit the sewing machine! 
Tip: If you would rather use different patterned fabric for your jar toppers instead of cross stitching, alot of sewing shops should give their scrap fabric away for free (which would be ideal). Penny Saver!


So here it is. My first finished jar topper! I can't wait to see what the others look like.


The jars I am using are 4Oz / 120ml round glass jars from Amazon.co.uk. and are an ideal size for wedding favours (smaller ones are available).

FYI: When using jars for food such as jam, they will need to be sterilised. When ordering, I found out that a lot of jars are not sterilised because of the manual handling they go through, in which case you will need to sterilise them in the oven yourself.


I feel the perfect finishing touch to these favours, would be personalised labels, which I have yet to sort out.


I have found some gorgeous ones on notonthehighstreet.com which would fit the jam and the honey perfectly. I love the colour and finish of the labels too. They are so simple and would fit the theme like a glove! 


There is a bit more work to do on the favours yet so keep watching this space! I will update it with further images as the project progresses.


Jam jars not float your boat?? Other ideas that fit the theme include:
  - Personalised packets of seeds
  - Miniature pails of sweets
  - Floral scented Yankee candles
  - Floral cupcakes
  - Small vintage gift-wrapped boxes of sweets
  - Mini jars of strawberry bon-bons

Check out my boards on: Pinterest