Showing posts with label Wedding. Show all posts

Tuesday, 2 June 2015

Painting A Thousand Words

Unbelievably, its been a whole year since my husband, Ed, and I got married. To celebrate this, we visited a part of the country very close to both our hearts - Cornwall.
As you're all probably aware, the traditional 1st year wedding anniversary gift is paper. Because of this, we decided to invest in a painting together whilst on holiday in Cornwall. It is a beautiful part of the country - full of inspiration, with picturesque views and colour splashed absolutely everywhere, making it a perfect location to find our anniversary gift!

One part of the county I was extremely keen to visit again was the charming St. Ives. This beautiful seaside town is understandably home to many artists and chock full of galleries (including the Tate!). There was no doubt in our minds that if we were to find our painting anywhere, it would be here.


As an Arty-Farty individual myself, I couldn't help but photograph nearly every colourful, chocolate-box nook and cranny of this town! It is so clear to me as to why artists move down there. 

After taking a walk down Smeaton's pier and watching the ocean for a while, Ed and I decided to wander in and out of all the art galleries we could find. The lovely thing about St. Ives, is there is a gallery for everyone. Whether it be a large, realistic style canvas you are after, something a little more abstract or the more modestly-priced print - it is here somewhere! You can spend a few pounds to a few thousand pounds and find something beautiful to display in your home. 


The view from the pier!


We were both very keen to find an original, and so had to bear in mind that this would come with a fairly sizable price tag. Although we budgeted, art is an extremely personal thing. If you fall in love with a piece, you have to be prepared to go over budget - do not settle for something you are not in love with! This is my one piece of advice when buying artwork.

There were a couple of galleries that stood out to us:
Porthminster Gallery - displaying the likes of Nick Bodimeade 
The Blue Bramble Gallery - displaying the likes of Sara Bevan 

But the art gallery that interested us the most and actually housed the painting we bought, was The Island Gallery. Home to the talented artist Bill Waldron and his work (along with other artists' pieces), it didn't take us longer than a cup of coffee to decide that we were more than happy to go over budget and buy his work.


The painting is of Smeaton's Pier, St. Ives, captured on a crisp February morning this year (2015). We loved how cool, bright and calm it looked. I admired the way Waldron had captured the sea, and Ed was taken by the sky. 


Not only was it a beautiful painting, but it was of somewhere that meant something to us. It was perfect.

A photo of where we thought our painting was captured from - minus all the people!


If you haven't already, I would definitely recommend you pay a visit to St. Ives. Not only for its art, but for its views, atmosphere, ice cream(!)... oh and the exercise you get - its very hilly and the walk down from the car park is steep! 


I would love to know what you think of our find. In fact, I feel we are both quite lucky we found a piece we both love equally as much. And if you do visit this lovely little town, pay the Island Gallery a visit - it's seriously worth the look.

Keep watching this space!
Zo..x

Sunday, 20 April 2014

Flower Jars

Hello everybody and Happy Easter!!

A couple of weeks ago, I started working on doing up some old jam jars to fill with spring flowers for the wedding. However, I think they are also perfect for Springtime celebrations - especially Easter Sunday. So instead of showing you how to work on an egg-themed project, I will be talking you through the process of how I made these simple 'vases'. They will look lovely on an Easter buffet table filled with daffodils.


Knowing that I wanted to use them for the wedding, I have spent the last year collecting jars of various shapes and sizes (with the help of my Mum and dear ol' Nan). For this project I had a rummage through them all and picked out my favourites ready for up-cycling. Once the jars were washed, I set up a 'station' outside ready to get working. I wanted to incorporate the colours of the wedding into the decoration of the jars, and so I decided to spray paint them. I only sprayed each jar approximately a third of the way up to add a bit of colour. I felt that doing the whole jar would compete with the colours of the flowers. Spray paint works better than brush painting as it gives a smoother finish. To do this, I bought three small cans of PlastiKote Fast Dry Project Enamel spray paint from Wilkinsons for £3.45 each. They are supplied at various other stores as well - see for yourself on the PlastiKote Website.


To achieve a clean line when spray painting, I used masking tape. Using a ruler and a CD marker, I marked about a third of the way up each jar all the way around. I then followed these marks with the masking tape to ensure I would get a clean, straight finish. I then worked my way up the rest of the jar with masking tape so that no other part of the jar would get marked with spray paint.

Then the fun began! 
Now for health and safety reasons, (which our wonderful country seem oh so fond of nowadays!) I would advise you do this in an open space (preferably outside) and even wear a dust mask. Start spraying the paint directly onto the glass jar - making sure you get an even coat all the way round. Another reason for doing this outside is because the paint gets EVERYWHERE! I came in dusted with paint in my hair, on my clothes, on my face, on my camera.... Once I finished spray painting each jar, I put them on a separate newspaper-covered table to dry. I repeated this method until all of them were done. The paint takes a few hours to fully dry.


Once dry, I carefully peeled off the masking tape.
And there we have it! Pretty, colourful jars ready for displaying seasonal flowers. Have a go at creating some fun floral jars for your next spring event. Its cheap, cheerful and so simple to do (and who doesn't like that?). I would love to see your take on it.


For the actual wedding, I would like to add some ribbon or lace as well. When they are all set up on the day, I will make sure to take some photos to share! 

I hope you enjoyed. Have a wonderful Easter and as always, keep watching this space!

Zo..x

Thursday, 20 March 2014

You Are Invited.... Chapter II

Just a quick post this time - well more of a progress update really. I have finally finished and sent out my Evening Invites!

You may remember the post I did on my Handmade Save-The-Dates. The theme was very 'English Country Tea'. Well, my evening guests didn't receive a save-the-date, and seeing as though the evening part of the wedding will be an English Country Tea (bunting and all!), I made the evening invites in exactly the same way.


The evening invites look the same on the front as the save-the-dates do. The layout inside is also very similar:
- Pretty paper backgrounds
- Main info on bottom page
- Further info on the top page
- Information mounted onto pearlescent paper

I then used the information from the day invites to help aid the wording in the evening ones. I also made some more of the 'Extra Information' booklets for the inside (as found in my first You Are Invited... post).


I used the same paper for the invite wording as I did for the information booklet - I felt this created a link between the evening and the day invitations.


I am so pleased they are finally all finished! Now that everybody has been invited, it is like a huge weight has been lifted. And I can't wait to crack on and finish all of my other little (or not so little) crafty projects.

Keep watching this space! I have recently completed my table plan board and I can't wait to share the process with you all.

Happy Crafting,
Zo..x


Saturday, 7 December 2013

You Are Invited...

For those of you who have sent out any kind of invite, you will appreciate that it can be quite difficult to fit in everything you think needs to included. It's all about compromise - you don't want to overload the guest with information, yet you don't want to leave them asking questions.
When choosing our wedding invites from Planet Cards, I chose to just include the basics that the guest absolutely needed to know (this didn't ruin the design either):
- Date of the wedding
- Time of the wedding
- The Venue(s) and addresses
- Information on gifts/money - this was achieved with a lighthearted poem
- When to RSVP by
- How to RSVP
I just needed a way to include a little extra information for our guests. 

After a little research, I found there are a few ways to include extra details. Examples include:
- Pockets built into the invites to insert maps and RSVP cards etc.
- Loose information cards to match the invite
- Including a web link to further information on the wedding day

Built in pockets were not an option as I had already chosen our invites, and I didn't like the thought of loose cards for fear of them going missing. I did like the web link idea - however not everybody in my family (grandparents for example) have access to a computer. I opted for an information booklet - all of the information would be in one place, and it wouldn't need a pocket in the invite as my plan was to use paper clips. 


With this idea, the first hurdle was deciding what was to be going into the information booklet:
Hotel Info
Including room tariffs, room information, hotel/venue website and number.

Alternative
Including a cheaper alternative for somewhere to stay, the address, website and number.

Map
A map from the venue to the alternative hotel.

Taxis
Although the hotel will probably have a list of local taxi firms, I thought it may be useful for guests to know them beforehand for pre-booking.

RSVP
What details to include when RSVP-ing.

After this I used scrap paper to create various booklet prototypes. I didn't want to use more than one sheet of A4 paper for each booklet to keep costs and materials down. Trialing was necessary! The first prototype in the above image was an experiment on how to fold paper to create the booklet. The second prototype was created from half a sheet of A4 paper, allowing me to print two per page. Even though this appealed to me, the words and map were just a little too small. This is when I came up with the third prototype - made from one sheet of paper, big enough to read, and easy enough to make.


Even though I had found a design that worked for our invite, I wanted to use something a little less stark than white paper - especially as the invites have a lovely vintage finish. I opted for a pack of cream paper that I picked up from Ryman in town. In the photographs, you can see how the booklets look before they are folded. They are made up of two rectangular pieces, each split into 3 equal sections. Each of these sections is a different page of information. To create these templates, I simply used a Table in Microsoft Word and printed them off on a laserjet printer at home. If you have lovely handwriting, or don't have access to a printer then these could be done by hand no problem. However, it would take a lot longer as a lot of measuring would be involved!
Once the rectangular pieces have been cut out, they each need to be folded into a concertina-like state in order to form the pages. The 'Table' idea within Microsoft Word made it really easy for this part of the process. I simply folded across the lines that split the strips into 3 sections. 


The next part of the process is to put the booklet together. For this, any kind of glue/adhesive suitable for paper will do but my personal favourite is double-sided tape. The idea is to stick the 'front page' of the booklet to the first 'inside page'. As seen in the top photo on the right, this creates the first two pages of the booklet. The second two pages of the booklet are created in the same way - the 'back page' is stuck to the last 'inside page'. Once the two components have been made, they then need to be fixed together (using more tape!) to create the entire booklet. This is done by sticking the back of the second page onto the back of the third page. You need to make sure that they are perfectly in line with each other to get a clean finish. Once this is done, I close the booklet and rub a small piece of paper over it to make sure it is fully adhered. I use paper instead of wiping my fingers directly over the finished product to prevent smudging of ink and marking. After this, I open the booklet and 'read' through it to make sure it all looks okay. Each one of these booklets took me around 10 minutes to make and were easy enough to do whilst relaxing in front of the television in the evening. As with any mini project, if you start early enough, it doesn't become a chore and you can just work on it every now and again until it is done!


And here is the finished product! A four page booklet including all the extra information (hopefully!) guests may require when receiving their invite. As with everything I make myself, I stamped the backs with my 'Handmade By Zoe' stamp - one of my favourite investments to date.


And this is what each of my day guests have received! I tried to keep the paper and the font as similar to the invite as possible so not to compromise the overall look.

I would love to know what you think. Have you done anything similar with an invite to a wedding, party or shower? Would you have done anything different? Let me know your thoughts and ideas by commenting below this post.
Alternatively you can message me:
Twitter: @ZibZobHandmade

Hope you enjoyed! And keep an eye out for the festive posts. I will be making Christmas cards, crafty gifts and sharing my pretty wrapping.

Keep watching this space!
Zo..x


Monday, 14 October 2013

Spread The Love

In my very first post, I explained to you all that we are going to be giving the ladies home-made jam for their wedding favours. As promised, that is just what me and my mum have achieved and this post is going to talk you through our process.

Now I think it's worth mentioning that my mum did most of the work on the actual jam making and so she should take the credit. However, I did point the camera and take the notes... (I also did some of the stirring!).

When making jam it is useful to get your hands on a preserving book - especially if you are looking to try out different jams and preserves. However if you are just looking for the one recipe, try t'internet! The book that we went by is The Preserving Book by Lynda Brown. The steps within this book are simple enough to follow, it has pictures (which is always lovely) and it is choc-full of all different kinds of recipes for jams and preserves.


The recipe from Lynda Brown's book makes approx 1kg of jam:
  - 1kg of strawberries
  - 6tbsp lemon juice
  - 900g granulated sugar and 5-6tbsp of strong pectin stock OR 900g of jam sugar


We changed the amounts to suit how much jam we needed. 

Step One - Hulling and Halving the Strawberries
Hulling the strawberries quite simply means removing the stalks from the strawberries. Although they look pretty, they do nothing for the jam! Once this has been done, the strawberries will need halving. If you get a particularly big strawberry, it may be worth quartering them. The strawberries do not need to be cut up any smaller or mushed as they will be broken down during the jam-making process. It's also nice to keep a little bit of texture in there.
Tip: We bought the strawberries when they were at their ripest as this is usually best for jam making. They are also cheaper this way too as there is little time left before they go mouldy. The timing was just right as jam can keep for around 9 months and the wedding was about that far away at the time. This is something that you need to take into consideration when planning a preserve - when is it needed for? when should I buy the fruit? Which fruit is in season? How much fruit do I need? We had 20 punnets of strawberries to produce the amount of jam needed.


Step Two - Add Lemon Juice
Once the strawberries have been cut up and transferred into a preserving pan, the lemon juice needs to be added. The reason for this is that acid needs to be present for a gel to form - allowing the jam to set and not be too runny. Lemon juice or citrus fruit is normally added for this to happen.
Tip: Don't worry if you don't have a preserving pan. A heavy-based saucepan or similar will do. We used a big casserole pan - you just need to make sure that during the process, you keep stirring so that it doesn't stick. 


In the Meantime...
Whilst the jam was heating and I had no other notes and photos to take until the next step... I sat out in the garden and made some discs for the jam jars. Wax discs are used to sit on top of the jam once it has been put in the jars. This helps to stop air and bacteria getting to the jam - preventing it from going mouldy. I went for the more cost effective option and made my own out of grease-proof paper. 
I simply drew around the neck of one of the jars and cut them out. It took a while as I had to make around 70 discs! But I had to wait for the jam anyway.


Step Three - Add Sugar
The strawberries need to cook gently until they are soft. Once the fruit has softened, it is time to add the sugar. I don't mean to state the obvious, but it depends on how much jam you are making as to how much sugar you use. For this particular pot-full we added three and a half bags! Once the sugar has been added, keeping the jam heating gently, it needs to be stirred until dissolved. I love the scent of the jam at this stage, it smells gorgeous! 
Tip: When stirring, if it feels gritty along the bottom of the pan, you know the sugar hasn't dissolved.


Step Four - The Rolling Boil
Once the sugar has dissolved, the heat needs to be turned up to allow the jam to boil. Once it has reached what is called a rolling boil, it needs to cook until it reaches the setting point. To test for a set, you need to remove the pan from the heat. 


Step Five - Testing for a Set
There are a few ways to test for a set. The technique we used was to put a teaspoon of boiling jam on a saucer that had been chilling in the fridge. Allow the jam to cool and then push it from one side with your finger. If the jam slightly wrinkles and your finger leaves a trail on the plate, then the jam has set. 


Step Six - Skimming
Using something as a skimmer (like a flat spoon), skim off any surface scum. This is the froth that forms on the top of the jam. The jam then needs to be left to cool slightly so that the berries are distributed evenly throughout the jam and a thin skin forms on the top.


Step 7 - Fill 'em Up!
Then its time to ladle the jam into warm sterilised jars! Jars don't usually come ready sterilised due to handling in factories. There are a few sterilising methods, but the two we used were the oven and the dishwasher.
Oven: Wash the jars and lids in hot water and drain upside down. Then pop them in an oven heated to 140°C/275°F/Gas Mark 1 and leave to sterilise for around half an hour.
Dishwasher: Simply wash the jars and lids on a hot wash.
The main reason we used both methods was because we had over 70 jars and lids to sterilise and needed as much room as possible!
Once the jam has been ladled into the jars, cover it with the wax / grease proof paper discs, seal the jars with the lids and store in a cool dark place. Once opened, you need to keep your jam in the fridge.

Try This For Taste
We deviated from the recipe slightly and added ground black pepper to the strawberry mixture. This brings out the flavour of the strawberries even more... and it really worked (even if I do say so myself). Next time you have a bowl of strawberries, instead of reaching straight for the sugar grab your pepper grinder. Take my word for it, its scrumptious! 


Now all I can do is sit and wait until the big day... and hope that the jam is still as yummy as when I tasted it during the making process! Until then, I shall keep my fingers crossed.

Have a go at making jam, it really is rewarding. I already know what I want to try next!
  - Fig & Vanilla Jam
  - Pumpking & Orange Spiced Jam
  - Spiced Port & Plum Jam

I hope you enjoyed my jam making post... and most of all I hope those of you that get it, enjoy my jam!

Keep watching this space.
Zo..x

Monday, 2 September 2013

Take A Seat At...

I'm sure you are all aware that table numbers play an important role in a wedding - even though they are such a small part of it. Your guests will walk through the doors, into the reception room, locate their name on the table plan, see the table number and off they pop to sit at their seat as happy as Larry (until they realise who they are sharing a table with!). 
Now I believe that just because table numbers are functional doesn't mean they can't be pretty - I mean they will become part of the decor after all. Because of this, I have decided to do just that, and make my table numbers part of the decoration.

Design Idea
The theme of my wedding is quite 'English Country Garden'. In-keeping with this, I have decided to name my tables after flowers rather than give them a number. After meeting with my florist, I gathered up the names of all the flowers being used on our big day and hey presto! I had my table names.
Once I had decided on the table names, I started to think about how to display them on each table. Before long I had four main elements I wanted to work with:
        - Photo frames
        - Floral paper
        - Diamantes
        - Pearls
The idea was to display the table names in attractive photo frames, backed onto floral paper and embellished with diamantes and pearls. In my head it looked lovely - I just had to try it out...!


___________________________________________________________


I started by choosing floral paper to mount the table names onto. I have used the same 12"x12" papers as I did on my Save-The-Dates to maintain continuity. These good quality papers come in a 32 pack (16 designs, 2 of each) and are available from Daisy's Jewels and Crafts.
I should be having around 10 tables at the reception (including the head table) and have chosen a different style paper for each one.


I wanted to add a touch of glamour and interest to the table names. Whilst visiting my recent home-away-from-home (Hobbycraft) I found some self-adhesive diamantes and pearls that would do the trick. I decided to add both to the mix and alternate them around the table name. The fact that they were self-adhesive sold them to me. This meant less mess to worry about and I knew they would look neat (no excess glue to ruin the look). 


I chose some thick, good quality paper in a parchment-style for the table names to be typed on to. I thought this style would add some charm and mix well with the floral patterns. I decided on the same font that I used on my Save-The-Dates for the Flower Names. To impress the passionate gardeners on my mum's side of the family, I included the Latin name underneath to add an extra touch!

Now even though I loved this idea and wanted it all to look as high quality as possible, I had a slight issue with finding the correct photo frames. As you know, they are not the cheapest of items to come across if you want something that looks half decent. I found that on average, the kind of frames I were looking at were around £8.00, which is £80.00 altogether!!! As I am trying to do a wedding on a budget, this just wasn't feasible. 

After a lot of searching, and thinking until my brain hurt I came across some pale blue and silver glossy frames in.... wait for it.... Poundland! Which came to a grand total of £11 (I bought one extra just in case). They fit the bill perfectly and look a lot better than one would have expected. During the process of creating my own decor, I have found that you really have to search, rummage and think a little more outside the box to get your perfect look for good money. 

And here they are! The end product.
In case you are wondering, they did take a little while, but I worked on them gradually in my spare time. This made them a fun little project. My one niggle would be the measuring out on each and every one to make sure every piece of paper were the same size and every diamante and pearl were spaced evenly. Having said that, precision is not a bad thing!

I would love to know your thoughts if you have any. Would you have done anything different? Maybe you have worked on something similar yourself. Keep me posted.

Keep watching this space.

Zo..x


Monday, 17 June 2013

Handmade Save-The-Dates

Hi guys! I know it has been a while since my last post, but the ball is really starting to roll on the hand-made stuff now so hopefully my posts will be a little more frequent! My next post is on my Save-The-Dates.

Now if I'm right, Save-The-Dates are more of an American tradition and we Brits don't tend to send them out. However, they do seem to be growing in popularity throughout the UK now. With our wedding falling on a bank holiday weekend, I thought this would be an ideal way to let my guests know early on and I could get in there before the thought of any weekend getaways!!

Right. Now the idea for my Save-The-Dates was again country garden - to compliment my evening theme. This immediately brought bunting, floral patterns and pastel colours into my head. With this to go from, my mum took a trip to Hobbycraft after work. Here she found a few bits and bobs for me to work with, and come up with a final design.

The Design Idea
Bunting - Four different flags strung together with pretty craft string and 'draped' across the front of the Save-The-Date.
Florals - Floral-print paper to trim the interior.
Pastels - Metallic pastel paper to mount the information onto.
Mini Calendars - A handy calendar card to the inside of the Save-The-Date for the guests to keep hold of. 


The Front
What I really like about this design, is that each and every Save-The-Date is different - due to the different bunting flags and string colour. 
The flags came with pre-cut holes which was handy for neatly threading the string. Once threaded, the flags were held in place by the use of mini square 3D foam adhesives. 
I love these because it prevents the design from looking too flat. The double sided foam adhesives can be picked up from most art shops and are very cheap. 
The blank cards themselves fitted the theme perfectly, as the bottom edge represents lace and also features rose motifs. These cards, the bunting flags and the string were all picked up from Hobbycraft (which recently has become my second home!!).


The Interior
These 12x12" papers were used for the inside of my Save-The-Dates and worked really well - especially for covering up the string from the bunting! I got them from an online craft suppliers I found called Daisy's Jewels & Crafts. The papers are very good quality and come in a 32 pack (16 designs, 2 of each) and have come in really handy for other wedding related projects - shhh! I'm not spilling just yet!


Here is a sneaky of the inside. The information and the mini calendar were printed on good quality, textured card. The information was mounted on metallic, pastel blue/green paper. All were fixed with the foam adhesives. 
The card and the metallic paper are from my recently acquired second home; Hobbycraft.


The Finished Product
Again, I love the personal touch. The fact that each one is different, causes me to like this even more. To be honest, I have spent many evenings making these. However, having other projects to work on and leaving myself plenty of time to do them, I have really enjoyed creating them - it has been fairly therapeutic!


I have added an extra personal touch by investing in a stamp that reads 'Handmade By Zoe' which I absolutely adore! If you are into making Christmas cards etc. and like this idea, then personalised stamps like this are available from NotOnTheHighstreet (love this site).


If any of you are thinking of creating your own Save-The-Dates, invites, order or service sheets or anything like this... I would definitely say go for it! Yes, it takes a little time finding all of the materials, but the outcome is so rewarding. Not only this, but the guests seem to appreciate them too!

I would love to know what you think, and if anybody has made anything similar to this... I would really fancy a nosey!

Keep watching this space,
Zoe..x


Saturday, 13 April 2013

Fab Favours

So the first chapter for my very first craft blog is my own wedding. Reason being, I would like to hand-make a lot of it (making it the perfect HBZ blog project).

Although stationary is probably the first thing I should have thought about, it was the second. The wedding favours were the first.

Okay, so the idea was to give my guests a country garden gift to go with the theme. My thinking was jars filled with yummy preserves. My mum's homemade jam is delicious and, luckily for me, she also has a friend that keeps bees. Hello Honey!
I then decided that jam would be the ideal gift for the ladies, and honey for the men.

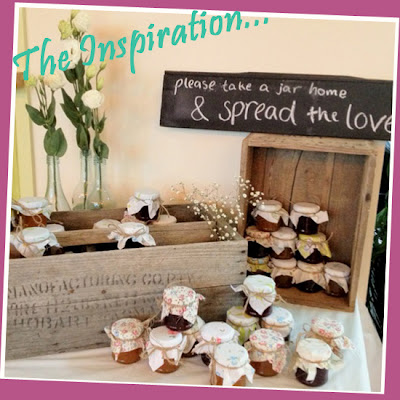
This was my starting point, so naturally I started looking for further inspiration.


I love the way the jars have been laid out in this photograph. This is a good idea for the evening guests as the day guests will have theirs at their place setting.

The fabric toppers are traditional and cute and would look lovely if they were all different patterns. 


Image found on Pinterest.


I love the personal touch, and even though homemade jam and fresh local honey is personal, it wouldn't be something I had created. To add that extra touch to the favours, I have decided to cross stitch the jar toppers.

The Idea:
Ladies - A cross stitched butterfly for the jam
Gents - A cross stitched bee for the honey
Young Children - A cross stitched ladybug


3 down, 117 more to go! Okay so there is a lot of work to do to get approx 120 toppers done it time. You find though that the more you do the faster you get and it is quite therapeutic.

Tip: It may sound like common sense, but if you are planning a crafty wedding, start waaaay in advance (around a year or so). Only because the deeper you progress into your plans, the more you struggle to find the time to keep on top of things. If you have friends or relatives that can help you out, let them! My mum is cross stitching in every spare minute she has!


The Process


After cross stitching my first bee, I decided the topper needed to be softened and made slightly bigger by the use of fabric. I picked up a couple of meters of cheap white cotton fabric from my local sewing shop and hit the sewing machine! 
Tip: If you would rather use different patterned fabric for your jar toppers instead of cross stitching, alot of sewing shops should give their scrap fabric away for free (which would be ideal). Penny Saver!


So here it is. My first finished jar topper! I can't wait to see what the others look like.


The jars I am using are 4Oz / 120ml round glass jars from Amazon.co.uk. and are an ideal size for wedding favours (smaller ones are available).

FYI: When using jars for food such as jam, they will need to be sterilised. When ordering, I found out that a lot of jars are not sterilised because of the manual handling they go through, in which case you will need to sterilise them in the oven yourself.


I feel the perfect finishing touch to these favours, would be personalised labels, which I have yet to sort out.


I have found some gorgeous ones on notonthehighstreet.com which would fit the jam and the honey perfectly. I love the colour and finish of the labels too. They are so simple and would fit the theme like a glove! 


There is a bit more work to do on the favours yet so keep watching this space! I will update it with further images as the project progresses.


Jam jars not float your boat?? Other ideas that fit the theme include:
  - Personalised packets of seeds
  - Miniature pails of sweets
  - Floral scented Yankee candles
  - Floral cupcakes
  - Small vintage gift-wrapped boxes of sweets
  - Mini jars of strawberry bon-bons

Check out my boards on: Pinterest